
There’s nothing quite like the joy of creating sweet, delightful treats in the kitchen. The aroma of baked goods wafting through your home cannot help but evoke feelings of nostalgia and warmth. Around the holidays, or even during a quiet weekend in, baking brings comfort and a chance to connect with loved ones. Whether you’re new to baking or a seasoned pro, the thrill that comes from whipping up something delicious is truly unmatched.
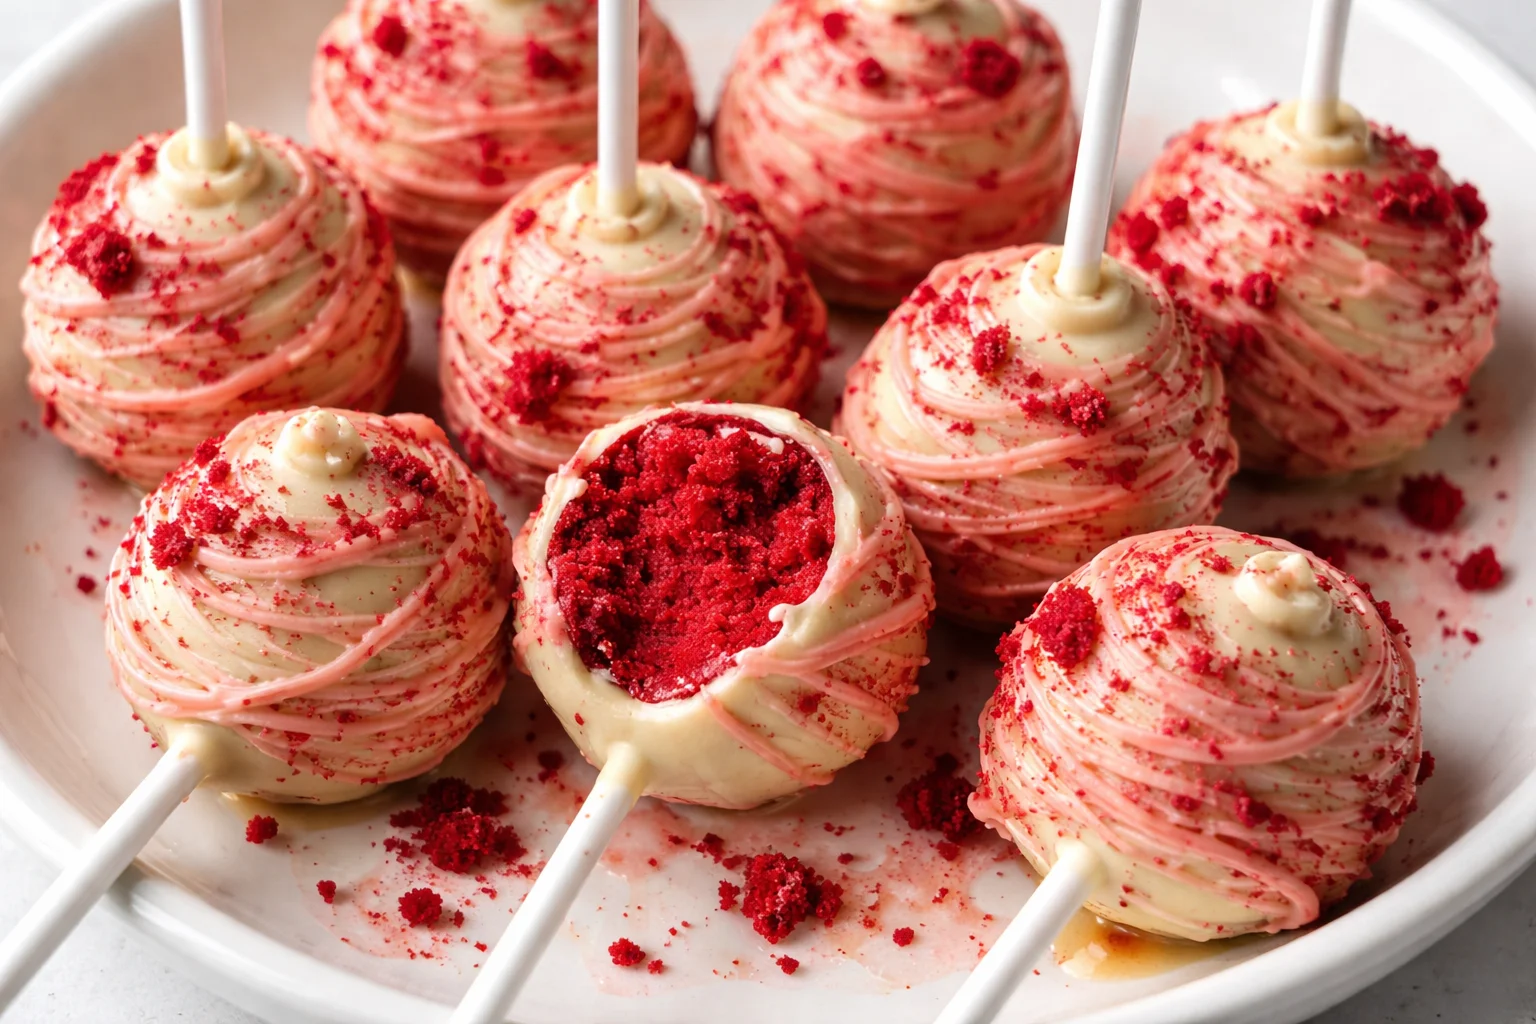
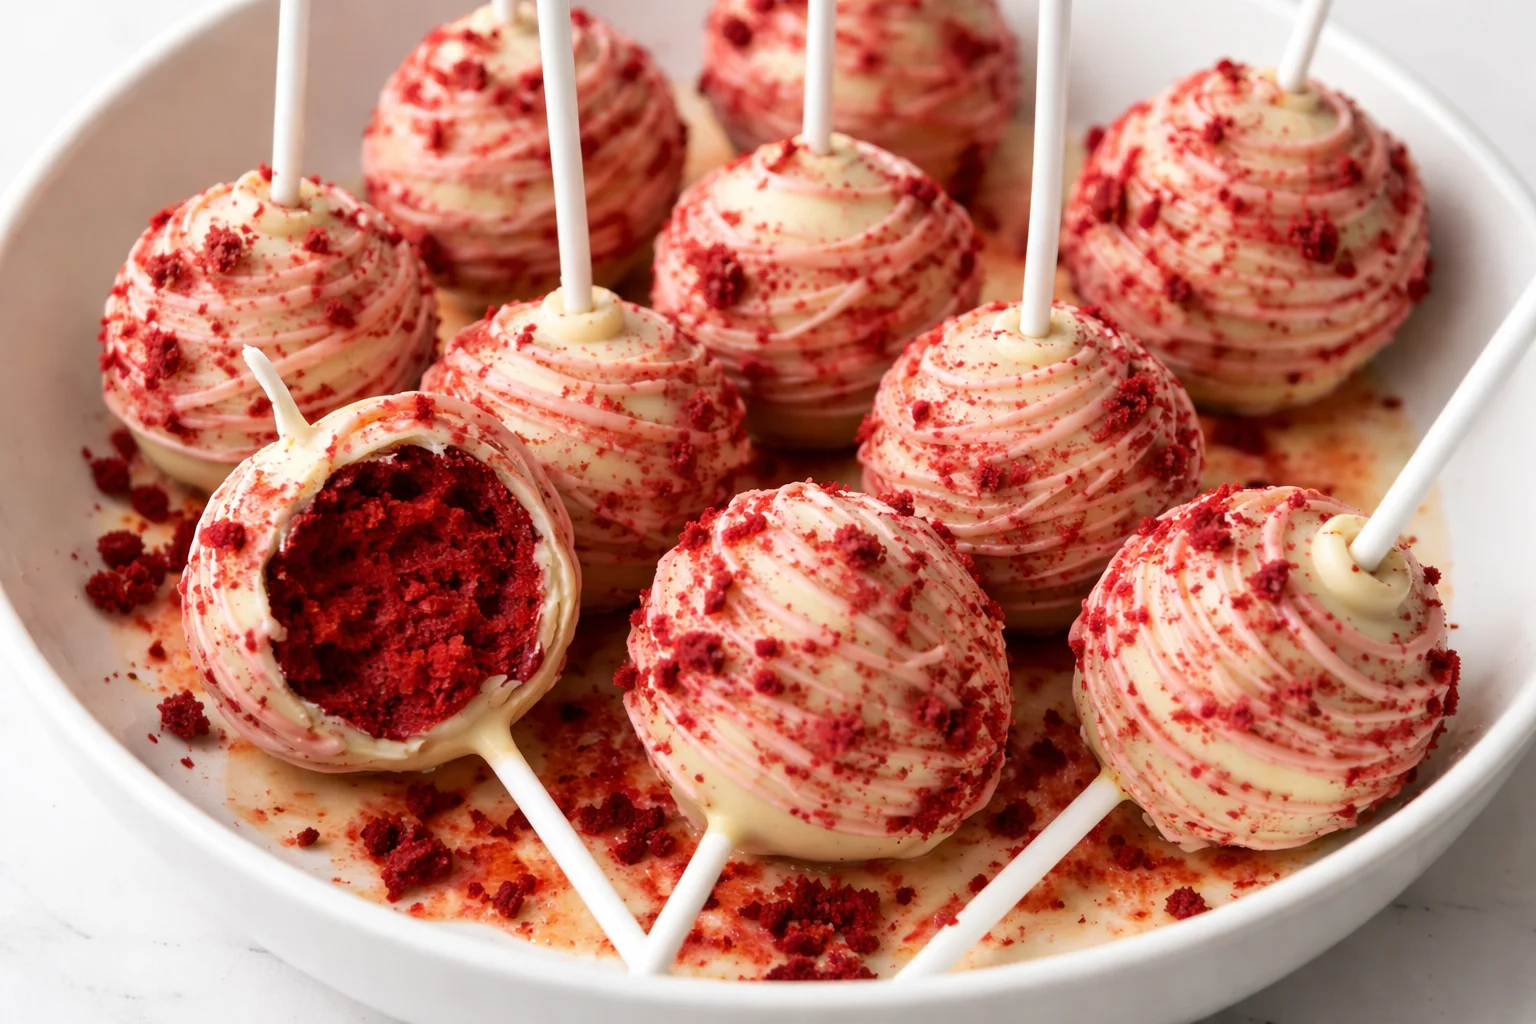
One classic favorite that sits proudly on the dessert table is red velvet cake pops. These little gems are the perfect fusion of rich flavors and beautiful colors. Not only are they visually striking, but they also pack a punch of sweetness and a hint of cocoa, making them a delightful treat for any occasion. Easy to pop into your mouth and share with others, they are a wonderful way to celebrate, commemorate, or simply enjoy a pleasurable moment with your favorite people. Let’s dive into the world of baking and create these heavenly red velvet cake pops that are bound to be a hit!
Kitchen Essentials You’ll Need
Cooking is a fabulous journey, and using the right tools can significantly enhance your experience. Here’s a list of some kitchen essentials that will help you along the way while making red velvet cake pops:
- Mixing bowls: A set of various sizes is essential for different stages of baking.
- Electric mixer: For achieving that light and fluffy cake batter.
- Baking sheets: Necessary for cooling your cake pops.
- Parchment paper: To prevent sticking during the cooling process.
- Melting pot or microwave-safe bowl: Perfect for melting your chocolate.
- Cake pop sticks: To hold your cake pops while dipping in chocolate.
- Cooling rack: Keeps your cake pops from getting soggy.
These tools ensure that everything flows smoothly, making your baking process more enjoyable and organized.
Why You’ll Love This Recipe
Red velvet cake pops are not just a treat for your taste buds; they’re a feast for your eyes and a warm hug for your soul. These delectable morsels have a beautiful red hue, a velvety texture, and are often adorned with a drizzle of white chocolate, making them not only delicious but fun to make and decorate. Here’s what makes them special:
Comfort and Joy: There is something deeply comforting about the flavors of red velvet—its touch of cocoa mingled with creamy frosting transforms every bite into love.
Perfectly Portable: Cake pops are the epitome of convenience! You can take them to parties, share them with friends, or even enjoy them as a personal treat at home.
Customizable: You can easily modify these pops to suit dietary needs or flavor preferences, ensuring that everyone can enjoy them.
Festive Appeal: Their vibrant color makes them a festive addition to any gathering. They’re perfect for birthdays, holiday parties, or simply for a sweet dessert!
These tiny, flavorful bites bring an element of fun to any occasion. Think of them as delightful little parcels of happiness that you can easily enjoy and share with others.
Red Velvet Cake Pops Ingredients
Creating your own red velvet cake pops is important, and having the right ingredients at hand is the first step toward deliciousness. Here’s what you’ll need:
- 1 box red velvet cake mix
- 1 cup water
- ½ cup vegetable oil
- 3 large eggs
- 1 can (12 oz) cream cheese frosting
- 2 cups white chocolate chips
- 2 tablespoons vegetable oil (for melting chocolate)
- Sprinkles (for decoration)
These ingredients come together to create delicious, moist, and decadent cake pops that everyone will love!
Step-by-Step Instructions
Now let’s dive into the fun part—making our red velvet cake pops! Follow these easy steps to ensure your cake pops come out perfect every time:
Start by preheating your oven to 350°F (175°C). Grease and prepare a round cake pan according to the package instructions for your cake mix.
In a large mixing bowl, combine the red velvet cake mix, water, vegetable oil, and eggs. Use an electric mixer on medium speed, mixing until the batter is smooth and fully combined.
Pour the batter into the prepared cake pan and bake for approximately 25-30 minutes, or until a toothpick inserted into the center comes out clean.
Once baked, allow the cake to cool in the pan for about 10 minutes. Then, transfer it onto a cooling rack to cool completely.
Once cooled, crumble the cake into fine pieces into another bowl. It should resemble fine crumbs and be easy to handle.
Add the cream cheese frosting to the crumbs, mixing well until fully combined. The mixture should be moist and sticky.
Now, form small balls (about 1 inch in size) with your hands and place them on a baking sheet lined with parchment paper. Once shaped, place the cake pops in the refrigerator for about 30 minutes to firm up.
Meanwhile, in a microwave-safe bowl, melt the white chocolate chips with 2 tablespoons of vegetable oil. Heat in intervals of 30 seconds, stirring until smooth and fully melted.
Once the cake pops have chilled, dip the end of a cake pop stick into the melted chocolate and insert it into each pop. This helps to secure the stick in the cake ball.
Next, dip each cake pop into the melted chocolate, covering it fully. Allow any excess chocolate to drip off before placing it back on the parchment paper.
While the chocolate is still wet, sprinkle with your desired toppings. Allow the pops to set completely at room temperature or in the refrigerator for about 15-20 minutes.
Once the chocolate has hardened, your red velvet cake pops are ready to enjoy!
Fun Variations You Can Try
Getting creative in the kitchen is part of the fun! Here are some variations to elevate your red velvet cake pops:
Cream Cheese Frosting: Instead of store-bought, try making your own cream cheese frosting for a richer taste.
Chocolate Coating: Use dark or milk chocolate instead of white chocolate for a different flavor profile.
Flavored Cake Mix: Swap out red velvet for other cake flavors for a unique twist—try chocolate or vanilla!
Spices: Add a pinch of cinnamon or nutmeg to the cake batter for added warmth and depth of flavor.
Dipping Sauces: Serve with caramel, raspberry sauce, or a chocolate drizzle for added deliciousness.
Colorful Coatings: Sprinkle with colorful edible glitter or different seasonal sprinkles to match occasions.
Each variation can lead to exciting new taste experiences and make your cake pops even more fun!
How I Love to Serve It
Presentation is key when it comes to desserts! With red velvet cake pops, there are endless ways to charm your guests:
Lovely Stand: Arrange your cake pops upright in a block of styrofoam or a decorative vase filled with rice or beans, showcasing their vibrant colors beautifully.
Serve with Dips: Create a dessert platter with various dips, so guests can enjoy different combinations of flavors.
Pair with Drinks: Serve alongside iced tea or hot cocoa for a cozy treat experience.
Add Sides: Small plates of berries or whipped cream can add a lovely contrast to the rich flavor of your cake pops.
Each serving idea creates an inviting atmosphere that encourages joy and sharing.
Helpful Tips from My Kitchen
Baking can be a science, and having a few tips up your sleeve can help ensure success with your red velvet cake pops:
Room Temperature Ingredients: For a smoother batter, ensure your eggs and other ingredients are at room temperature before mixing.
Don’t Overmix: When combining the cake mix, mix until just combined to avoid dense cake pops.
Chill Your Cake Balls: Chilling the cake balls helps them retain their shape during dipping and gives a firmer texture.
Test the Chocolate Temperature: Ensure the melting chocolate isn’t too hot. If it is, wait a minute before dipping the cake pops to avoid melting them.
Enjoy the Process: Baking is as much about enjoying yourself as it is about the final product. Take your time, and don’t stress!
Baking should be as satisfying as the product itself, so make sure to celebrate your creations.
Important Cooking Reminders
As with any recipe, here are some essential reminders to keep in mind:
Safety First: Ensure all surfaces and tools are clean to prevent contamination.
Reheating: Cake pops can be stored in the fridge in an airtight container for up to a week. If you’d like to enjoy them later, simply let them come to room temperature before serving.
Storage Tips: Keep your cake pops in a cool place to maintain their texture; they do best when refrigerated but can be left out for short periods.
Common Mistakes to Avoid: Make sure the cake is completely cooled before crumbling. If it’s warm, it can result in a gooey mess.
Staying mindful of these points will help create the best cake pops possible!
Nutritional Information (Estimated)
When it comes to satisfying your sweet tooth, red velvet cake pops offer a delightful indulgence, but it’s always smart to be aware of their nutritional content. Here’s a rough breakdown:
- Each cake pop contains approximately 150-200 calories.
- About 20 grams of carbohydrates are packed into each treat.
- Total fat content is around 7-10 grams, depending on the chocolate used.
- Each pop delivers about 2 grams of protein.
Understanding the estimated nutritional values allows you to enjoy these treats mindfully.
Recipe Details
- Prep Time: 30 minutes
- Cook Time: 30 minutes
- Total Time: 1 hour
- Yield: Approximately 24 cake pops
Common Questions You Might Have
What’s the best way to store cake pops?
Cake pops can be stored in an airtight container in the refrigerator for up to a week. For longer preservation, you can freeze them, just remember to allow them to thaw in the fridge before serving.
Can I make these cake pops gluten-free?
Absolutely! Substitute the red velvet cake mix with a gluten-free blend, and be sure to check your other ingredients to ensure they’re gluten-free.
How can I make them less sweet?
To tone down the sweetness, reduce the amount of frosting mixed with the cake crumbs or use less chocolate for dipping. You could also opt for dark chocolate instead of white to balance sweetness.
Conclusion
Creating red velvet cake pops can be a delightful experience, transforming any day into a celebration. The process not only fills your kitchen with inviting aromas but also offers a wonderful opportunity to connect with family and friends while creating something beautiful. In every detail from mixing to decorating, you are crafting more than a treat. You’re creating memories, sharing love, and indulging in sweetness that brings smiles all around. It’s adventure, creativity, and comfort—all wrapped in gorgeous red velvet.
As you embark on your cake pop journey, remember that each bite is a celebration of rich flavors and delightful textures. The red velvet cake pops are not only delicious but also a fantastic way to bring joy into your home. Whether for a holiday gathering or simply a special treat for yourself, these pops have a special way of brightening the day. Enjoy the lovely process, and share your creations with those you love!
Print
Red Velvet Cake Pops
- Total Time: 60 minutes
- Yield: 24 cake pops 1x
- Diet: Vegetarian
Description
Delightful red velvet cake pops that are perfect for any occasion, combining rich flavors and beautiful colors.
Ingredients
- 1 box red velvet cake mix
- 1 cup water
- ½ cup vegetable oil
- 3 large eggs
- 1 can (12 oz) cream cheese frosting
- 2 cups white chocolate chips
- 2 tablespoons vegetable oil (for melting chocolate)
- Sprinkles (for decoration)
Instructions
- Preheat your oven to 350°F (175°C) and prepare a round cake pan according to the instructions on the cake mix box.
- In a large mixing bowl, combine the red velvet cake mix, water, vegetable oil, and eggs. Mix until smooth using an electric mixer.
- Pour the batter into the prepared cake pan and bake for 25-30 minutes, or until a toothpick comes out clean.
- Let the cake cool in the pan for 10 minutes, then transfer it to a cooling rack to cool completely.
- Crumble the cooled cake into fine pieces into another bowl.
- Add the cream cheese frosting to the crumbs and mix until fully combined.
- Form small balls (about 1 inch) and place them on a parchment-lined baking sheet. Refrigerate for 30 minutes.
- While chilling, melt the white chocolate chips with 2 tablespoons of vegetable oil in a microwave-safe bowl, heating in intervals and stirring until smooth.
- Dip the end of a cake pop stick into the melted chocolate and insert it into each cake ball.
- Dip each cake pop into the melted chocolate and let any excess drip off before placing back on the parchment paper.
- Sprinkle toppings while the chocolate is still wet and let them set completely at room temperature or in the refrigerator for 15-20 minutes.
- Enjoy your red velvet cake pops!
Notes
For a richer taste, consider making your own cream cheese frosting. You can also customize the chocolate coating or add spices for variations.
- Prep Time: 30 minutes
- Cook Time: 30 minutes
- Category: Dessert
- Method: Baking
- Cuisine: American
Nutrition
- Serving Size: 1 cake pop
- Calories: 170
- Sugar: 15g
- Sodium: 200mg
- Fat: 8g
- Saturated Fat: 4g
- Unsaturated Fat: 3g
- Trans Fat: 0g
- Carbohydrates: 20g
- Fiber: 0g
- Protein: 2g
- Cholesterol: 30mg
Keywords: cake pops, red velvet, dessert, festive treats, easy baking