On cool autumn evenings my kitchen smells like cinnamon and butter and everything feels like a cozy hug. I can still hear my grandmother humming while she rolled out dough on that well-worn board, her hands leaving little floury fingerprints everywhere. That memory is what keeps me coming back to this simple, golden dessert. Apple Pie sits at the center of so many family traditions, from impromptu weekend baking to holiday tables that stretch late into the night. When the apples soften and the sugar caramelizes, the aroma fills the house and people drift in from other rooms as if by magic. This version is forgiving and homey, the kind you can make on a school night or for a crowd with the same warm result. It’s about texture, the tender apples wrapped in a flakey crust, and the slow, happy bubbling that tells you everything is just right. I love sharing this kind of recipe because it’s comfortable, approachable, and impossible not to love when it comes out of the oven warm and fragrant.
Kitchen Essentials You’ll Need
Making a classic apple pie is as much about the tools as it is about the ingredients. A few key items will help you get that perfectly browned top and tender apples every time. You do not need fancy equipment, just reliable basics that make the process calmer and more enjoyable.
- 9-inch pie plate (glass or metal)
- Large heavy-bottomed pot or skillet for cooking the filling
- Rolling pin and lightly floured work surface
- Sharp knife and apple peeler or corer
- Pastry brush for the egg wash
- Mixing bowls and measuring cups and spoons
A sturdy pot helps the butter and sugar meld with the apples without scorching. A good rolling pin and a cool, floured surface make it easier to get a thin, even crust. The pastry brush gives you that shiny, golden finish. These little tools help the baking feel less like a chore and more like a ritual you can savor.
Why You’ll Love This Apple Pie
There is a softness to a well-made apple pie that feels like a warm blanket. Each slice is a little piece of comfort, both nostalgic and deeply satisfying. The filling has a gentle balance of sweet and tart, while the crust offers a tender, flakey contrast. This recipe highlights the apples and cinnamon without drowning them in syrup. You will notice the cozy caramel fragrance as it bakes. Here are the reasons I reach for this recipe time and again.
- Real apple texture. The apples cook until tender but not mushy, so each bite has a pleasant, yielding snap.
- Balanced sweetness. Brown sugar gives depth so the pie never tastes cloying.
- Buttery crust. A hand-pressed and crimped crust becomes lightly crisp and flaky.
- Versatility. It works for weeknight treats or for the center of a holiday table.
This Apple Pie is practical and forgiving. You do not need perfect pastry skills to get a gorgeous result. The aroma will draw people in and the first warm bite will remind you why pie matters. It’s a dessert that makes a house feel like home.
Apple Pie Ingredients
1 Perfect Pie Crust Recipe*, ¼ cup butter, 8 cups thinly sliced apples** (peeled and cored), 2/3 cup lightly packed brown sugar, 1 tablespoon all-purpose flour, 2 teaspoons cinnamon, 1 teaspoon lemon juice, ¼ teaspoon salt, 1 egg, 1 teaspoon water, Coarse sugar (optional)
I like to keep a few pantry staples on hand to round out the recipe when needed. A pinch of extra salt, a splash of vanilla, or a scant teaspoon of nutmeg can deepen the flavor if you want a slightly richer spice profile. If your apples are very sweet, a teaspoon of lemon juice helps brighten the filling. For the crust, make sure the dough is cold and handled gently so it bakes up flakey. If you prefer a lower-sugar version, you can reduce the brown sugar slightly and add a tablespoon of cornstarch if you like a firmer filling.
Step-by-Step Instructions
- Preheat the oven and prepare the pie plate. Set aside a 9-inch pie plate and preheat the oven to 425 F. Make sure your pie plate is dry and set on a baking sheet to catch any drips.
- Melt the butter. Melt the ¼ cup butter in a large pot over medium-low heat until it becomes fragrant and starts to foam gently.
- Add the apples and seasonings. Add the 8 cups thinly sliced apples** along with 2/3 cup lightly packed brown sugar, 1 tablespoon all-purpose flour, 2 teaspoons cinnamon, 1 teaspoon lemon juice, and ¼ teaspoon salt. Stir to combine so each slice is coated.
- Cook until slightly softened. Cook the apple mixture, stirring occasionally, until the apples soften and the sugar has melted into a glossy sauce, about 8 to 10 minutes. You will see the edges of the slices turn translucent and steam rising. Remove from the heat and set aside to cool slightly so the filling is warm rather than piping hot.
- Roll the dough for the bottom crust. Meanwhile, divide the prepared pie dough in half if it is not already in two discs. Lightly flour a work surface and roll one disc out to about 1/8-inch thick, a bit larger than your pie plate. The dough should feel cool and pliable.
- Fit the crust into the plate. Gently transfer the rolled sheet of dough into the pie plate, pressing it into the bottom and up the sides. Smooth out any large air pockets with your fingers and trim any ragged edges later.
- Make the egg wash. Make the egg wash by whisking together the 1 egg and 1 teaspoon water in a small bowl. Set aside. This will give the top crust a deep golden sheen.
- Fill the pie. Transfer the cooled cooked pie filling into the prepared crust. Pile the apples so they sit slightly mounded in the middle for an even bake.
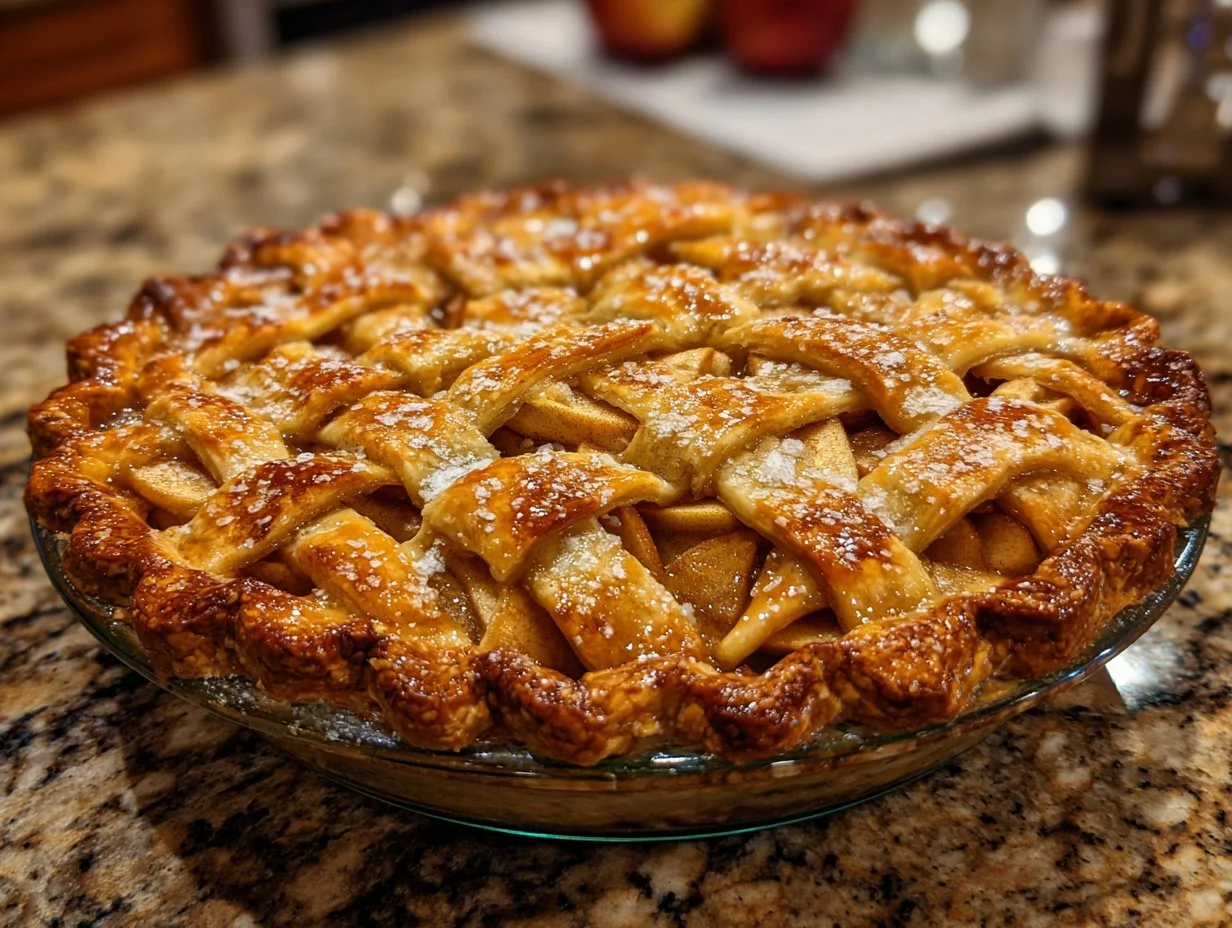
- Roll and place the top crust. Roll the other disc of pie dough out on a lightly floured surface and transfer it on top of the pie. For a decorative twist, cut the rolled pie dough into strips and braid or lattice the top. If using a whole sheet, cut a few vents in the top crust so steam can escape.
- Trim and seal the edges. Trim the excess dough hanging over the sides and crimp the edges of the pie with your fingers to seal. A neat edge helps the pie look finished and keeps filling from oozing out.
- Brush and sugar the surface. Lightly brush the top of the pie with the egg wash and sprinkle evenly with coarse sugar if you like a crunchy finish. This will caramelize and sparkle as it bakes.
- Bake and check. Bake the pie for 15 minutes at 425 F, then reduce the temperature to 350 F and continue baking until the crust is golden brown and the apple pie filling bubbles through the vents, about 40 more minutes. Look for a deep amber color on the crust. Cover the edges with a piece of aluminum foil if they begin to brown too quickly. Let the pie rest and cool before slicing so the filling sets.
{image_2}
Fun Variations You Can Try
- Swap apples. Use a mix of Granny Smith for tartness and Honeycrisp for sweetness to create a more layered taste.
- Add nuts. Stir in 1/2 cup toasted chopped walnuts or pecans to the filling for crunch and a toasty flavor.
- Brown butter crust. Replace the butter in the crust with browned butter for a toffee-like note.
- Spiced-up. Add 1/4 teaspoon nutmeg and a pinch of allspice for a warmer spiced profile.
- Lower sugar. Reduce the brown sugar to 1/2 cup and add 1 tablespoon cornstarch to help thicken the filling if your apples are very juicy.
- Vegan option. Use a plant-based butter for the crust and a flax “egg” wash for the top.
- Caramel drizzle. Warm 1/2 cup caramel sauce and drizzle it over slices when serving for extra indulgence.
- Mini pies. Make individual hand pies using smaller rounds of dough for portable treats.
These tweaks let you personalize sweetness, texture, and richness without changing the heart of the recipe. Small swaps can make this pie feel brand new.
How I Love to Serve It
There is a little ritual I follow when serving this pie. I let it cool long enough that the slices hold together but not so long that the crust loses its warmth. I cut generous wedges, letting the steam curl up as I transfer each slice to a plate. A scoop of vanilla ice cream is classic and melts slowly into the warm filling. For a more grown-up touch, a dollop of whipped cream dusted with cinnamon brings a cloud-like softness.
Serve alongside:
- A scoop of vanilla ice cream or a spoonful of crème fraîche.
- A small pot of homemade caramel for drizzling.
- Strong coffee or a milky cup of tea to balance the sweetness.
The atmosphere matters as much as the plate. Soft lighting, a table with mismatched plates, and the sound of conversation makes the pie taste even better. This is a dessert that invites lingering. People pull up chairs and share stories while reaching for another slice.
Helpful Tips from My Kitchen
- Keep everything cold. For a flakey crust, keep dough cold until it goes into the oven. Warm butter ruins flakiness.
- Don’t overwork dough. Handle pastry gently. A few lumps of butter in the dough are a good thing and create pockets of steam and flakiness.
- Slice apples uniformly. Use a sharp knife or mandoline to keep apple slices the same thickness so they cook evenly.
- Taste and adjust. If your apples are very sweet, add a bit more lemon juice. If they are tart, a touch more brown sugar balances them.
- Test for doneness. The filling is done when it is bubbling vigorously through vents and the crust is a deep golden brown.
- Rest the pie. Let the pie cool at least 1 to 2 hours before cutting. This keeps the filling from running and makes cleaner slices.
- Protect crust edges. If the edges brown too fast, tent them with foil after the first 20 minutes.
- Use a rimmed baking sheet. Place the pie on a rimmed sheet to catch any bubbling filling and keep your oven clean.
- Make ahead. You can prepare the filling and refrigerate it overnight, or freeze the unbaked pie for up to a month.
These small routines will help you feel confident. Baking a pie is partly technique and partly intuition. Trust your senses.
Important Cooking Reminders
- Keep the dough and butter cold to ensure a flakey crust.
- Use a rimmed baking sheet under the pie to catch any bubbling filling and prevent oven messes.
- If the crust browns too quickly, tent with foil to avoid burning while the center finishes baking.
- Allow the pie to cool for at least 1 to 2 hours before slicing so the filling sets.
- Store leftovers covered in the refrigerator for up to 4 days or freeze slices wrapped tightly for longer storage.
- Reheat by placing slices in a 350 F oven for 10 to 15 minutes to bring back flakiness and warmth.
- Do not leave baked pie out at room temperature for more than two days if your kitchen is warm.
- Use oven mitts and caution when handling the hot pie and baking sheet to avoid burns.
Nutritional Information (Estimated)
This is an estimate for one slice when pie is cut into eight servings. Each slice has roughly 350 to 420 calories depending on apple variety and crust thickness. Carbohydrates are the largest component, mainly from the apples and sugar, with about 45 to 60 grams per slice. Fat comes from the crust and butter, averaging 14 to 20 grams. Protein is modest, around 2 to 4 grams. These numbers can vary if you alter sugar or crust proportions or serve with ice cream.
Recipe Details
- Prep Time: 30–45 minutes (active)
- Cook Time: 55–60 minutes (including temperature change)
- Total Time: About 2.5 hours including cooling
- Yield: One 9-inch pie, 8 slices
{image_1}
Common Questions You Might Have
How do I prevent a soggy bottom?
- Use a thickener like the 1 tablespoon of all-purpose flour called for in the ingredients. Make sure you cook the filling briefly so some moisture reduces before filling the pie. A hot oven at the start helps set the bottom crust quickly. Also, baking on a preheated baking sheet helps the bottom cook through.
Can I use frozen or pre-sliced apples?
- You can use frozen apples in a pinch, but thaw and drain them well to remove excess moisture. Fresh apples are best for texture. If using pre-sliced store apples, taste them first. If they seem very sweet, add a little more lemon juice. If very tart, add a touch more brown sugar.
What is the best way to reheat leftovers?
- For a flakey, warm slice, reheat in a 350 F oven for 10 to 15 minutes. If you prefer, microwave a single slice for 20 to 30 seconds to warm quickly, but the crust will not be crisp. For the freshest texture, re-crisp in the oven or a toaster oven.
Conclusion
I hope this recipe fills your kitchen with warm memory-making moments. Baking this Apple Pie is one of those rituals that slows a busy day and gives you something to share with people you love. The smell of cinnamon and butter, the gentle bubbling of the filling, and the golden, crimped edges are small comforts that add up to something meaningful. If you ever want a slightly different take, I like to read other versions to spark ideas like lattice tops or caramel finishes. For inspiration and a few technique notes I sometimes compare with other trusted recipes like The BEST Apple Pie Recipe and a simple, homey take such as Easy Apple Pie Recipe (Just like Grandma Made!). Thank you for letting me walk you through this one. When you pull your pie from the oven, take a moment to breathe it in, slice slowly, and serve with someone who makes your day brighter.
Print
Classic Apple Pie
- Total Time: 120 minutes
- Yield: 8 servings 1x
- Diet: Vegetarian
Description
This comforting apple pie features tender apples and a flaky, buttery crust, perfect for any occasion.
Ingredients
- 1 Perfect Pie Crust Recipe*
- ¼ cup butter
- 8 cups thinly sliced apples (peeled and cored)
- 2/3 cup lightly packed brown sugar
- 1 tablespoon all-purpose flour
- 2 teaspoons cinnamon
- 1 teaspoon lemon juice
- ¼ teaspoon salt
- 1 egg
- 1 teaspoon water
- Coarse sugar (optional)
Instructions
- Preheat the oven to 425°F and prepare a 9-inch pie plate on a baking sheet.
- Melt ¼ cup butter in a large pot over medium-low heat.
- Add 8 cups thinly sliced apples, brown sugar, flour, cinnamon, lemon juice, and salt. Stir to combine.
- Cook the apple mixture, stirring occasionally, until softened, about 8-10 minutes. Let cool slightly.
- Roll out one disc of prepared pie dough to fit the pie plate and transfer it to the plate.
- Whisk together the egg and water to make an egg wash.
- Fill the bottom crust with the apple mixture, mounding it slightly in the center.
- Roll out the second disc of pie dough and place it over the filling. Cut vents for steam to escape.
- Trim and crimp the edges of the pie.
- Brush the top with egg wash and sprinkle with coarse sugar if desired.
- Bake for 15 minutes at 425°F, then reduce the temperature to 350°F and bake for an additional 40 minutes until the crust is golden brown.
- Let the pie rest for 1-2 hours before slicing.
Notes
For best results, keep everything cold and avoid overworking the dough. Serve with vanilla ice cream or whipped cream and enjoy!
- Prep Time: 30 minutes
- Cook Time: 55 minutes
- Category: Dessert
- Method: Baking
- Cuisine: American
Nutrition
- Serving Size: 1 slice
- Calories: 385
- Sugar: 22g
- Sodium: 210mg
- Fat: 18g
- Saturated Fat: 8g
- Unsaturated Fat: 9g
- Trans Fat: 0g
- Carbohydrates: 54g
- Fiber: 3g
- Protein: 2g
- Cholesterol: 30mg
Keywords: apple pie, dessert, fall recipe, cozy, homemade, family recipe