I still remember the afternoon my neighbor knocked with a warm tray and that buttery, chocolate-scented hush that makes a whole house stop. That memory is why I keep coming back to a thick, pillowy cookie that feels like a hug from the oven. Ultra Thick Bakery Style Chocolate Chip Cookies sit somewhere between a tender cake and a chewy cookie, and they make weekday afternoons feel special.
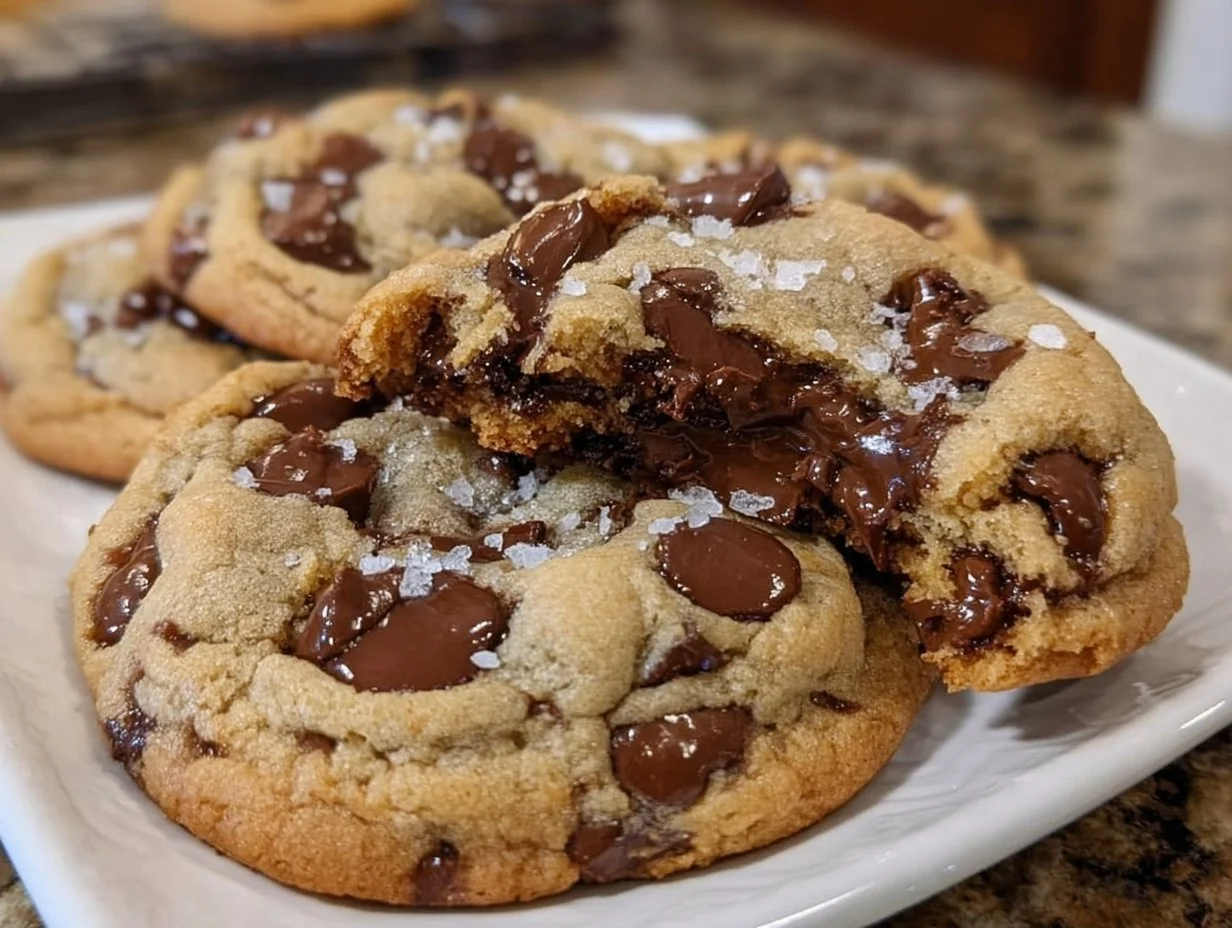
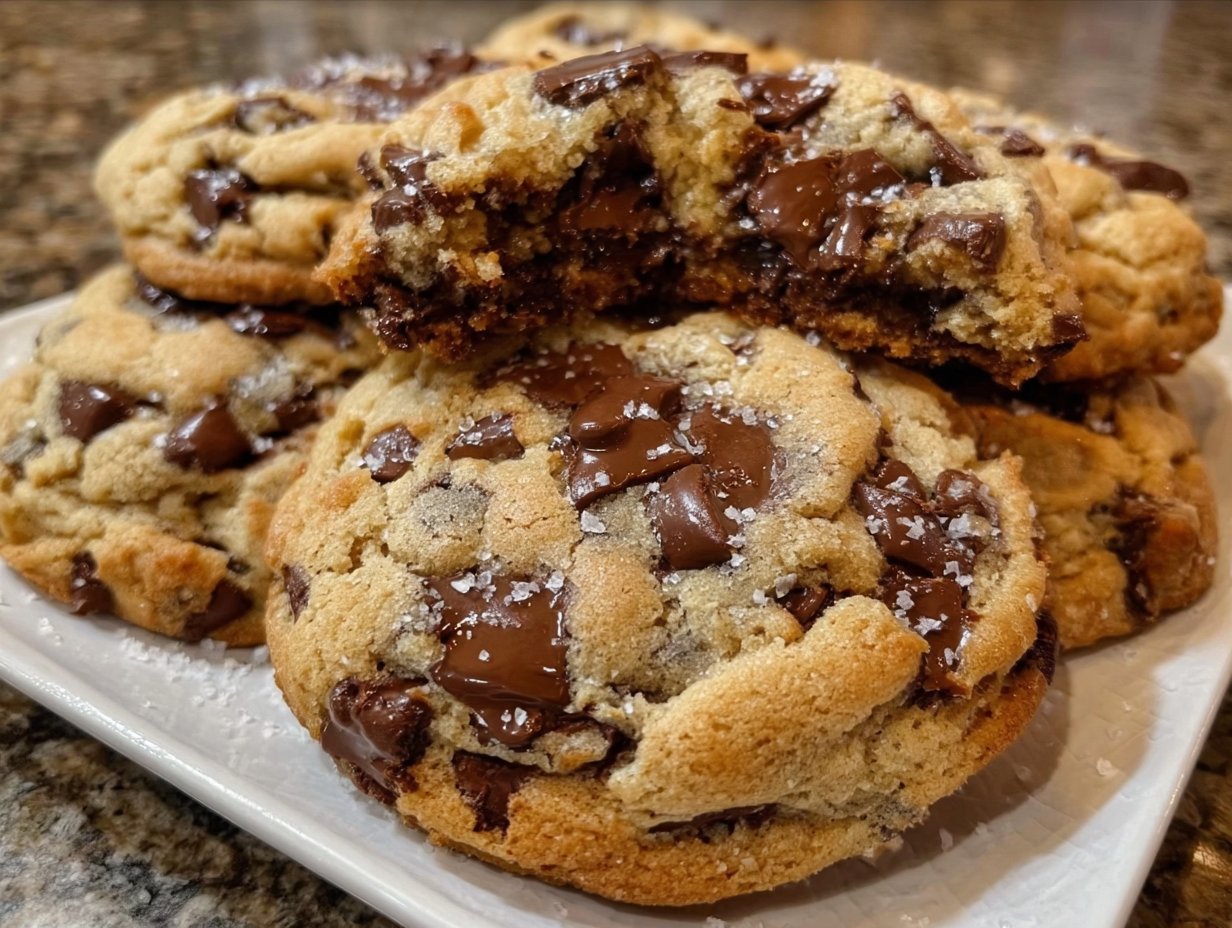
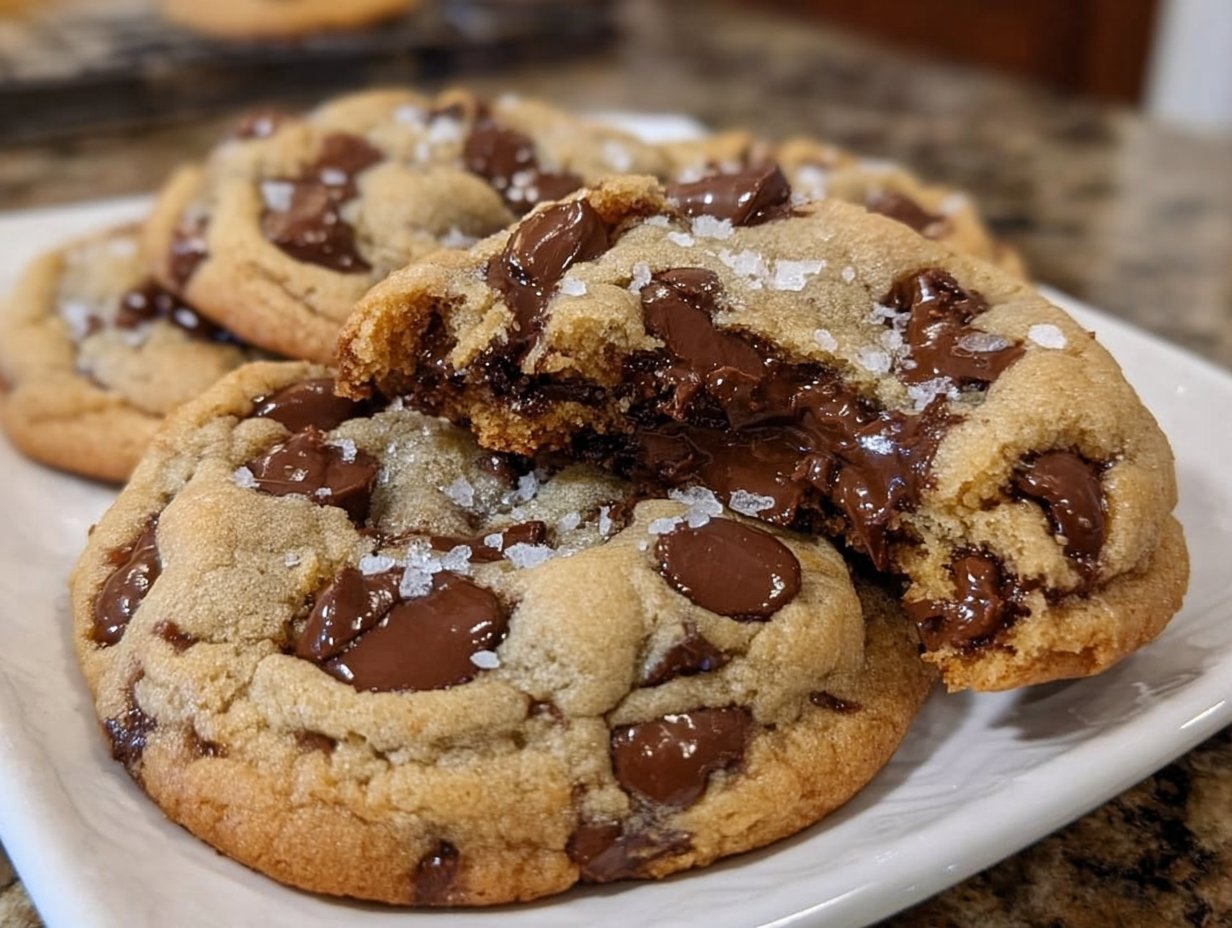
When you pull one from the pan, the top should be golden with a cracked, tender surface and chocolate pockets melting into glossy puddles. If you love learning little tricks that turn good cookies into unforgettable ones, I also love this classic chocolate chip cookie recipe for comparison and technique. I’ll walk you through the tools, the exact ingredients, and the small steps that add that bakery-style lift. By the end you will have cookies that are tall, soft in the center, and edged in caramelized crispness. Let’s bake something that people will remember.
Kitchen Essentials You’ll Need
Before you begin, gather a few dependable tools that make these cookies turn out bakery-perfect every time. Good equipment is like a calm sous chef. It does the heavy lifting so you can focus on the joyful parts.
- Large mixing bowls for dry and wet ingredients
- Whisk, rubber spatula, and a sturdy wooden spoon
- Measuring cups and spoons that are accurate and leveled
- Cookie scoop (about 2 tablespoon size) for uniform balls
- Parchment paper and rimmed baking sheets for even baking
- Wire rack for cooling so cookies set properly
A stand mixer is lovely but not essential. A hand mixer works fine, and using melted butter makes this recipe forgiving for hand mixing. An oven thermometer is one of my favorite tiny investments. It keeps the heat honest so your cookies rise and set as intended.
Why You’ll Love This Ultra Thick Bakery Style Chocolate Chip Cookies
There is a special comfort in a cookie that gives you layers of texture. These cookies are made to be tall and tender, not flat and brittle. The centers stay soft and almost fudgy while the edges get that gentle snap you crave. The balance of brown sugar and granulated sugar creates caramel notes that play beautifully with mixed semisweet and dark chocolate chips. Close your eyes when you break one in half. You will see the crackled top and smell browned butter hits even though we use melted butter for ease.
Here are a few reasons you will keep making them:
- Bakery-style height that holds up to dunking
- Rich, complex sweetness from both sugars and the chocolate blend
- Easy-to-follow method suitable for busy weeknights or weekend treats
- Dough that responds well to chilling so you can plan ahead
This recipe is also wonderfully forgiving. Chill time helps the fat solidify so cookies do not spread too thin. The result is a cookie that looks and tastes like it came from the corner bakery without needing a professional mixer or specialty ingredients. These are the kind of cookies you bring to a neighbor to say hello or tuck in a lunchbox for a surprise smile.
Ultra Thick Bakery Style Chocolate Chip Cookies Ingredients
2 large eggs, 2½ cups all-purpose flour, 1 teaspoon baking soda, ½ teaspoon salt, 1 cup granulated sugar, ½ cup packed light brown sugar, 1 teaspoon vanilla extract, 3 cups chocolate chips (mixed semisweet and dark), 14 tablespoons unsalted butter (melted and slightly cooled), Extra chocolate chips and flaky sea salt (optional for topping)
You can measure these right into a bowl and keep the extras for topping. I like to use a mix of semisweet and dark chocolate chips because the dark chips give a hint of bitterness that plays against the sugars. The melted and slightly cooled butter helps the dough spread just enough to make a tender interior. The two large eggs add structure and moisture so the cookies remain thick. If you want, keep a pinch of flaky sea salt on hand for finishing; that tiny contrast lifts the chocolate flavor.
Pantry staples you might already have are useful. A bit of extra flour for dusting your scoop and a small bowl for chilling the dough make the whole process smoother. If you keep an oven thermometer and parchment paper nearby, you are all set to bake with confidence.
Step-by-Step Instructions
- Mix the Dry Ingredients: In a large mixing bowl, whisk together the flour, baking soda, and salt. Start with a light whisking so the leavening is evenly distributed. The flour should look uniform and free of lumps. The baking soda will give the cookies lift. When you smell a faint wheaty scent, you know the dry mix is ready.
- Prepare the Wet Ingredients: In another bowl, combine the melted butter with the granulated sugar and brown sugar. Beat in the eggs one at a time, followed by the vanilla extract. The butter should be warm but not hot so it does not cook the eggs. Whisk the sugars into the butter until glossy. Adding eggs one at a time gives a smooth, emulsified batter. The mixture will smell sweet and caramel-like as the brown sugar melds with the butter.
- Combine and Fold: Slowly add the flour mixture into the wet ingredients and gently fold until just combined. Avoid overmixing. Use a spatula and fold with gentle, wide motions. Stop when you see no streaks of flour. The dough will be thick and slightly sticky. Overmixing tightens gluten and can flatten the cookies, so resist the urge to keep stirring.
- Chill the Dough: Cover the dough with plastic wrap and refrigerate for at least 30 minutes. Chilling firms up the butter and hydrates the flour a bit. The dough will become firmer and easier to scoop. The cold dough is key for keeping these cookies tall rather than spread thin.
- Preheat and Prep: Preheat the oven to 350°F (175°C) and line baking sheets with parchment paper. Make sure the oven reaches temperature before baking by waiting a few extra minutes after the preheat signal. Parchment prevents sticking and promotes even browning. If you use a dark pan, drop the oven temperature by 5 to 10 degrees to avoid overbrowning.
- Scoop and Shape: Using a cookie scoop, portion out the dough onto the sheets, leaving space between each ball. I like a 2-tablespoon scoop for substantial cookies. Roll slightly if you prefer a more uniform dome. Place balls with at least 2 inches between them. Press a few extra chocolate chips onto the tops if you want a dramatic melty surface.
- Bake: Bake for 12 to 15 minutes until the edges are golden brown. Watch for the cookie tops to set and develop tiny cracks. The centers should still look slightly underbaked and soft. The aroma will go from sugary to toasty and delicious as they finish.
- Cool and Set: Let the cookies cool on the sheet for about 5 minutes before transferring them to a wire rack. This resting time lets the cookie complete its set without breaking. They will be soft at first and firm up into a tender, thick bite as they cool. Sprinkle with flaky sea salt if desired for that bakery finish.
Fun Variations You Can Try
- Swap some chocolate chips for chopped toasted pecans or walnuts for crunch and warm nuttiness.
- Use browned butter in place of melted butter to add a toasty, caramel flavor note. Cool it slightly before combining with sugars.
- For a white chocolate and cranberry twist, replace half the chips with white chocolate and fold in dried cranberries.
- Make them double-chocolate by exchanging ¼ cup of flour for unsweetened cocoa powder. You may need a touch more flour if dough becomes too loose.
- For a softer cookie, chill the dough longer, even overnight. Chilling also concentrates flavors and makes the dough easier to portion.
- To make them gluten-free, use a 1-to-1 gluten-free flour blend and add a teaspoon of xanthan gum if your blend lacks it.
- Lower-sugar version: reduce granulated sugar by 2 tablespoons and add a touch more brown sugar for chew without losing moisture.
These variations keep the structure intact while exploring textures and flavors. Taste as you go and trust your instincts. A few extra chips on top before baking always makes photos and first bites irresistible.
How I Love to Serve It
I love serving these cookies slightly warm so the chocolate is gooey and the interior is tender. Place a single cookie on a small plate with a soft linen napkin for a cozy, informal moment. For a dessert plate, pair a warm cookie with a scoop of vanilla ice cream for that classic contrast of hot and cold. If I am sharing at a party, I arrange them on a wooden board with clusters of fruit, a dish of extra chocolate chips, and a small bowl of flaky sea salt so guests can finish them as they like.
When serving at afternoon tea, I set mugs of hot cocoa or cold milk nearby. For brunch gatherings, I tuck cookies into small paper bags for guests to take home. If you love the idea of a simple bakery spread, try pairing with other favorites like scones or classic chocolate snowball cookies for a variety that keeps people reaching back for more. The keys are warmth, simplicity, and making each bite feel like a tiny celebration.
Helpful Tips from My Kitchen
These are the small habits that give big results. First, measure flour correctly by spooning it into the cup and leveling with a knife. Too much flour makes dense cookies. Use slightly cooled melted butter rather than hot to avoid cooking the eggs. Chill the dough at least 30 minutes; longer chilling gives deeper flavor and better shape. When scooping, keep the balls uniform so they bake evenly. If your cookies bake too flat, try chilling the baking sheet between batches.
If you want to speed up cleanup, line your counter with parchment while scooping. For perfectly round cookies, roll the scooped dough gently between your palms. Rotate baking sheets halfway through if your oven runs hot on one side. Keep an eye on the last 3 minutes of bake time because ovens vary. If you like crisp edges, bake until edges are golden brown. For softer centers, pull them when the center still looks slightly underdone; they will finish while cooling. Finally, taste the dough safely with a small spoonful so you can adjust salt or vanilla for your personal preference.
Important Cooking Reminders
- Always preheat your oven fully before baking for even rise and consistent timing.
- Let cookies cool on the sheet for about 5 minutes to finish setting before moving to a wire rack.
- Store cooled cookies in an airtight container at room temperature for up to 4 days.
- For longer storage, freeze baked cookies in a single layer, then transfer to a freezer bag for up to 3 months.
- To reheat frozen cookies, thaw at room temperature and warm in a 300°F oven for 5 to 7 minutes.
- Keep children and pets away from hot pans and the oven door while baking.
- Avoid overmixing dough to prevent tough or flat cookies.
- Use an oven thermometer to verify your oven’s temperature for best results.
Nutritional Information (Estimated)
Estimated per cookie (based on 24 cookies): Calories are roughly 220 to 260 depending on chip amount. Carbohydrates will be the highest component at about 25 to 30 grams. Fat comes from butter and chocolate and is around 12 to 16 grams per cookie. Protein is modest from the eggs and flour at about 3 to 4 grams. These numbers are approximate and will vary with portion size and ingredient brands. If you are tracking macros, consider using lighter chocolate or smaller scoops to reduce calories and carbs.
Recipe Details
- Prep Time: 20 minutes active, plus 30 minutes chill time
- Cook Time: 12 to 15 minutes per batch
- Total Time: About 1 hour (including chill)
- Yield: About 20 to 24 cookies, depending on scoop size
Common Questions You Might Have
How long can I chill the dough and will it change the cookies? Chilling can be from 30 minutes up to 72 hours. Longer chilling develops flavor and keeps the cookies taller. If you chill overnight, let the dough sit at room temperature for 10 to 15 minutes before scooping so it is easier to portion. You may find the texture becomes chewier with longer chilling.
Can I make the dough ahead and freeze it? Yes. Scoop dough onto a parchment-lined tray and freeze until solid. Transfer the frozen dough balls to a freezer bag. Bake from frozen, adding 1 to 3 minutes to the bake time. This is a great way to have fresh-baked cookies on demand.
Why did my cookies spread too thin and how do I fix it? Common causes are too-warm dough, too much butter, or an oven that is hotter than expected. Chill the dough longer, measure flour correctly, or reduce oven temperature by 5°F. Using parchment or a lighter-colored baking sheet can also prevent too-fast edge browning that accompanies spreading.
Conclusion
There is something quietly satisfying about making cookies that look like they belong in a bakery window and taste like they were made just for you. These Ultra Thick Bakery Style Chocolate Chip Cookies bring comfort in every bite. They reward a little patience in chilling and a few careful scoops with tall, tender centers and edges that caramelize into a gentle crisp. I hope you bake a batch for a busy afternoon, a small celebration, or a neighbor who needs a smile. When I take a warm cookie from the pan and press a few extra chips on top, I think of that first tray handed over the fence. Baking this way is a small ritual that turns ordinary moments into memories. If you try the recipe, tuck a leftover cookie into your own pocket and remember the smell of chocolate and butter and the way the first bite makes everything slow down. Ultra Thick Bakery Style Chocolate Chip Cookies are the kind of treat that keeps people coming back for one more.
Print
Ultra Thick Bakery Style Chocolate Chip Cookies
- Total Time: 55 minutes
- Yield: 20 to 24 cookies 1x
- Diet: Vegetarian
Description
Indulge in these tall, tender cookies with crisp edges and chocolate puddles, perfect for any occasion.
Ingredients
- 2 large eggs
- 2½ cups all-purpose flour
- 1 teaspoon baking soda
- ½ teaspoon salt
- 1 cup granulated sugar
- ½ cup packed light brown sugar
- 1 teaspoon vanilla extract
- 3 cups chocolate chips (mixed semisweet and dark)
- 14 tablespoons unsalted butter (melted and slightly cooled)
- Extra chocolate chips and flaky sea salt (optional for topping)
Instructions
- Mix the dry ingredients: In a large mixing bowl, whisk together the flour, baking soda, and salt.
- Prepare the wet ingredients: In another bowl, combine the melted butter with granulated and brown sugars, then beat in the eggs one at a time, followed by the vanilla extract.
- Combine and fold: Slowly add the flour mixture into the wet ingredients and gently fold until just combined.
- Chill the dough: Cover the dough with plastic wrap and refrigerate for at least 30 minutes.
- Preheat and prep: Preheat the oven to 350°F (175°C) and line baking sheets with parchment paper.
- Scoop and shape: Portion out the dough onto the sheets, leaving space between each ball.
- Bake: Bake for 12 to 15 minutes until the edges are golden brown.
- Cool and set: Let the cookies cool on the sheet for about 5 minutes before transferring them to a wire rack.
Notes
For best results, chill the dough longer for deeper flavor and better shape.
- Prep Time: 20 minutes
- Cook Time: 15 minutes
- Category: Dessert
- Method: Baking
- Cuisine: American
Nutrition
- Serving Size: 1 cookie
- Calories: 260
- Sugar: 25g
- Sodium: 150mg
- Fat: 16g
- Saturated Fat: 8g
- Unsaturated Fat: 6g
- Trans Fat: 0g
- Carbohydrates: 30g
- Fiber: 1g
- Protein: 4g
- Cholesterol: 30mg
Keywords: chocolate chip cookies, bakery style cookies, dessert recipe