
I remember the first time I rolled these up on a rainy Tuesday night, the kitchen smelling like warm tortillas and a little spice, and my kids arguing over who got the crunchiest one. A simple pan of taquitos turned that ordinary evening into a small celebration, full of laughter and sticky-cheese smiles. Crispy Chicken Taquitos arrive with that exact kind of comfort: handheld, warm, and ready to soothe a busy weeknight.
They are my go-to when I need something satisfying that cooks up fast but still feels special. If you like recipes that turn pantry staples into dinner magic, you might also enjoy the way I season and bake things until that golden, irresistible edge appears, similar to how I crisp up other family favorites like crispy baked chicken wings for game night. These taquitos are flexible, forgiving, and perfect for feeding a crowd or saving leftovers for an easy, delicious lunch.
Kitchen Essentials You’ll Need
Good tools make a simple recipe feel professional and easy. For these taquitos you do not need anything fancy. A few reliable items will save time and help create even browning and crisp edges.
- Large mixing bowl to combine the filling evenly.
- Baking sheet lined with parchment or lightly greased for easy cleanup.
- Pastry brush or spray bottle for oiling the tops for crispness.
- Microwave-safe plate to warm tortillas briefly.
- Measuring spoons for balanced seasoning.
- Rubber spatula or spoon to fold and push filling when rolling.
A sharp knife and a cutting board for chopping cilantro and any extras is helpful. If you have a wire rack to elevate the taquitos on the sheet, you will get even crisper bottoms, but it is not required. These tools keep the process relaxed and manageable, especially on a busy weeknight.
Why You’ll Love This Crispy Chicken Taquitos
There is a special kind of joy in food that is crunchy on the outside and creamy on the inside. Crispy Chicken Taquitos deliver that contrast in spades. Each bite gives you a crackling shell that yields to a warm, cheesy, slightly spicy center that tastes like home.
- Texture play. The outer tortilla bakes into a thin, shattering crisp while the interior stays tender and saucy from the cream cheese and salsa.
- Family-friendly flavor. The mild heat of chili powder and cumin keeps things cozy without blowing anyone away, and you can easily make it spicier for adults.
- Hands-off finish. Once they are rolled and on the sheet, the oven does nearly all the work. This makes them perfect for busy nights, potlucks, and casual get-togethers.
- Versatile toppings. From cool sour cream to bright cilantro and zingy guacamole, each garnish adds a fresh layer that complements the warm filling.
These taquitos are the kind of recipe you can memorize in one night and return to again and again. They are comforting, quick to assemble, and deliver consistent crunchy satisfaction. Whether you are feeding picky kids or serving grownups who want something nostalgic, these taquitos hit the right note every time.
Crispy Chicken Taquitos Ingredients
2 cups cooked shredded chicken (rotisserie chicken works great), 4 oz cream cheese, softened, ½ cup shredded cheddar or Mexican blend cheese, ¼ cup salsa (mild or spicy), ½ tsp garlic powder, ½ tsp chili powder, ½ tsp cumin, Salt and black pepper to taste, 8 small flour or corn tortillas, Cooking spray or oil (for brushing), Chopped cilantro, Sour cream, Guacamole, Extra shredded cheese
I like to keep the ingredient list short and friendly. Use rotisserie chicken for speed or poach and shred leftover chicken breasts. The cream cheese makes the filling creamy and helps the shredded cheese cling to the chicken. Salsa provides moisture and a spark of flavor without making the filling runny. If you prefer a tangier profile, try a chunkier salsa verde. Feel free to reach for corn tortillas for a more authentic crisp texture or flour tortillas for a softer roll that still browns beautifully. Salt carefully at the end to taste, especially if your chicken was seasoned.
Step-by-Step Instructions
- Preheat your oven to 425°F (220°C). Line a baking sheet with parchment paper or lightly grease it for easy removal later. You should smell the oven warming up and see a dry heat that will help create crisp edges.
- In a large bowl, combine the shredded chicken, cream cheese, shredded cheese, salsa, garlic powder, chili powder, cumin, salt, and pepper. Mix them well until every bite of chicken is coated in flavor. The texture should be creamy with visible flecks of spice and little pockets of melted cheese.
- Warm the tortillas in the microwave for about 20 seconds. This will help soften them, making them pliable and easier to roll without tearing. They should feel warm and slightly more elastic when you press them.
- Spoon 2–3 tablespoons of the filling onto one side of each tortilla. Roll tightly, ensuring the filling is secure within. Tuck the ends under slightly if you can. The rolled taquitos should be snug and compact so they will hold together while baking.
- Place the taquitos seam-side down on the prepared baking sheet. Lightly brush the tops with oil or spray with cooking spray. A thin sheen of oil is the secret to that golden-brown color and the satisfying crunch.
- Bake in the preheated oven for 15–20 minutes or until they turn golden brown and crispy. For an extra crunch, consider broiling for 1–2 minutes at the end. Watch them carefully during broiling; the color changes quickly from golden to deep brown.
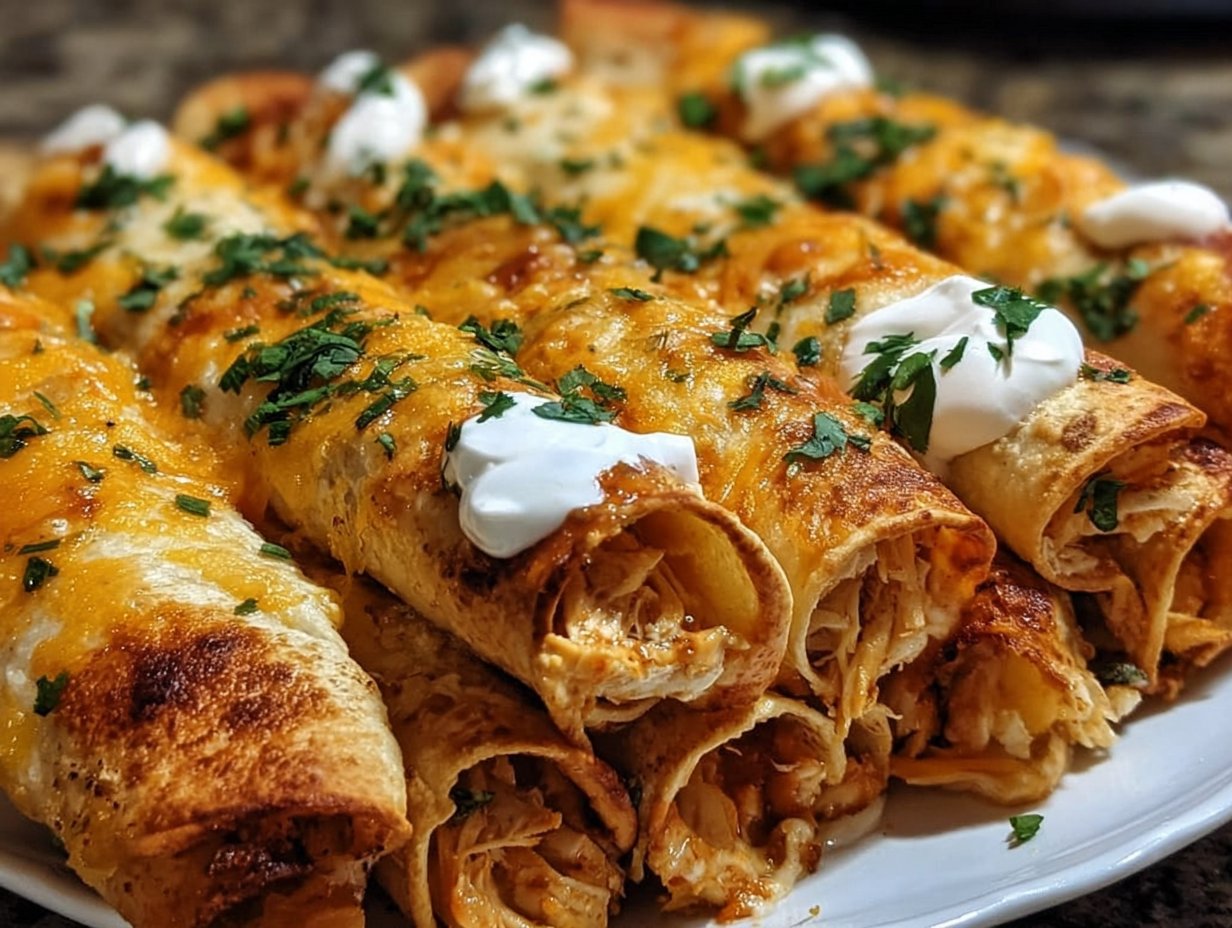
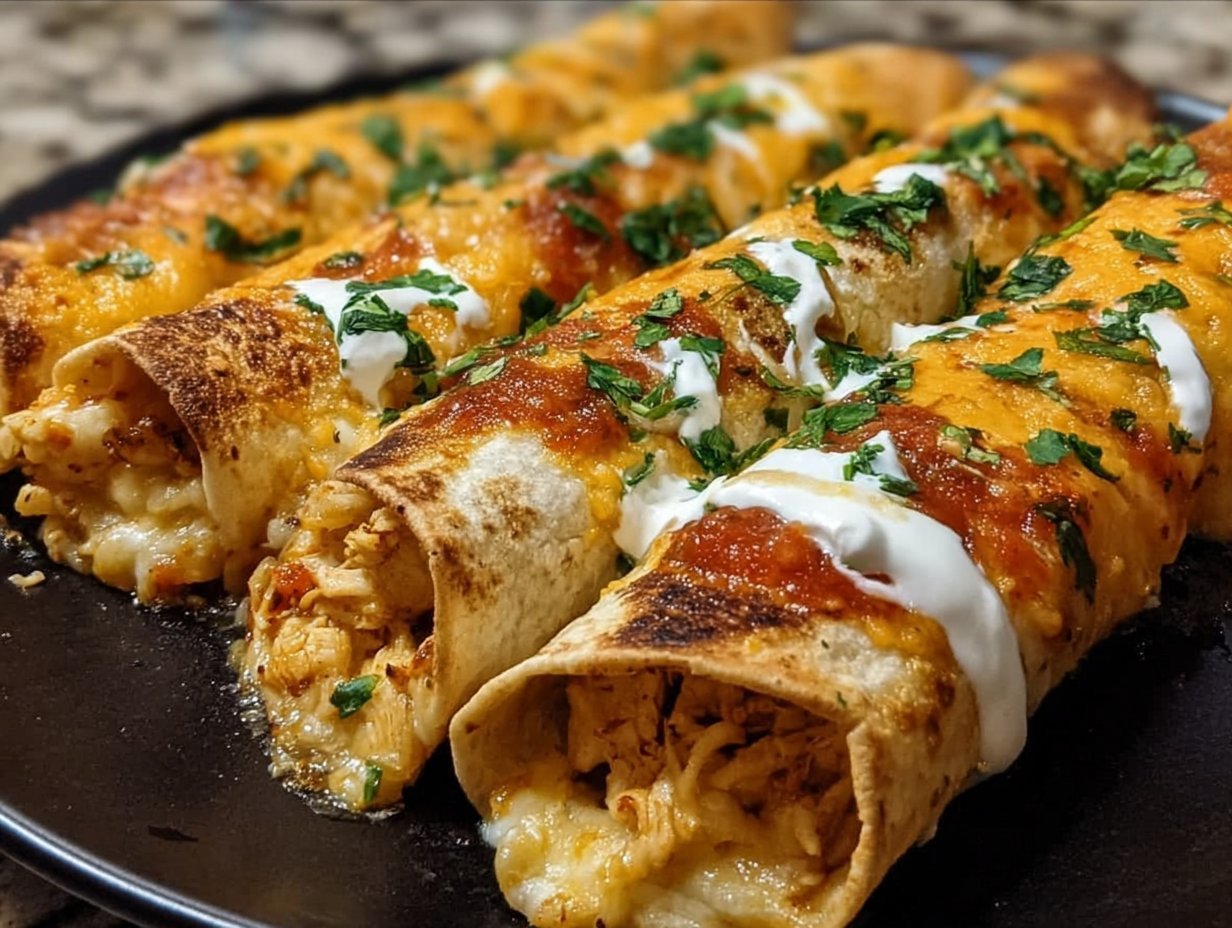
- Serve warm with sour cream, guacamole, or your favorite toppings. Sprinkle chopped cilantro and extra shredded cheese on top if you like. The aroma of warm spices and melted cheese will make everyone reach for their forks.
Fun Variations You Can Try
- Swap the cream cheese for a blend of Greek yogurt and a touch of mayo for a tangier, lighter filling that still tastes creamy.
- Make them smoky by adding a spoonful of chipotle in adobo to the filling, or use a smoky paprika instead of chili powder.
- For a vegetarian twist, replace the chicken with shredded, roasted sweet potatoes or black beans and corn. Add a squeeze of lime and a pinch more cumin.
- Change the cheese profile: try pepper jack for heat, Monterey Jack for creaminess, or queso fresco crumbled on top after baking.
- Make them in the air fryer for extra crunch in less time. Preheat to 400°F and air fry 6-8 minutes, turning halfway through.
- To make them freezer-friendly, roll and place on a baking sheet to flash-freeze, then transfer to a sealed bag. Bake from frozen adding 5–7 minutes to the baking time.
These little swaps let you tailor the richness, heat level, and dietary needs while keeping the core, cozy experience intact.
How I Love to Serve It
I like to present these taquitos on a wide platter with a few small bowls of toppings waiting like a little buffet. The crunchy, golden tubes look cheerful when lined up, their edges dusted with a little extra cheese that melts into tiny browned flecks. Serve them hot so the contrast between the crisp shell and the creamy filling is at its best.
Side ideas:
- A crisp, simple slaw with lime and cilantro cuts the richness.
- Black beans warmed with a bay leaf and a squeeze of orange for depth.
- Charred corn salad tossed with lime and a pinch of chili powder.
Set a casual table with paper napkins and sliced limes for squeezing. Let everyone assemble their own plate with dollops of sour cream, guacamole, chopped cilantro, and salsa on the side. The atmosphere becomes relaxed and playful, perfect for family dinners, a neighborhood potluck, or a cozy night curled up with a movie.
Helpful Tips from My Kitchen
- Keep the filling thick. If the mixture seems too loose from a very wet salsa, drain it slightly or stir in a tablespoon of extra shredded cheese to bind things together. A slightly drier filling rolls and bakes better.
- Warm tortillas briefly. They are less likely to crack when rolling. I microwave them between damp paper towels so they steam just a little.
- Do not overfill. Two to three tablespoons per tortilla keeps them compact so they cook evenly and do not burst open.
- Brush with oil thoughtfully. A light, even brush helps the color and crunch without making them greasy. I like avocado oil for a neutral flavor.
- If you prefer extra crisp on both sides, place a wire rack on the baking sheet and arrange taquitos on the rack. Air circulates underneath and around for uniform browning.
- Label and freeze in a single layer first, then stack in a freezer bag. Reheat from frozen at 400°F until crisp, about 12–16 minutes.
- For an air fryer twist, follow the variation notes. For safety and even cooking, do not overcrowd the basket.
I find these small rituals and techniques make the difference between a good batch and a truly craveable batch.
Important Cooking Reminders
- Keep an eye during broiling; taquitos can go from golden to burnt in a minute.
- Reheating: bake at 350°F for 8–10 minutes or air fry at 350°F for 4–6 minutes to regain crispness.
- Storage: Refrigerate in an airtight container up to 3 days. Freeze for up to 2 months.
- Safety: Ensure chicken is fully cooked to 165°F before shredding if you are cooking it yourself.
- Avoid sogginess by serving immediately after baking or reheating until hot and crisp.
Nutritional Information (Estimated)
A single taquito will be moderate in calories with a comforting balance of carbs, fats, and protein from the tortilla, cheeses, and chicken. Rough estimates per taquito are about 220–300 calories depending on tortilla type and how much oil you use. Carbs come primarily from the tortilla while fat is from cream cheese and shredded cheese. Protein is supplied by the chicken and cheese, making these a satisfying snack or part of a meal. Adjust portion sizes and toppings to manage calories and macros.
Recipe Details
- Prep Time: 15 minutes
- Cook Time: 15–20 minutes
- Total Time: 30–35 minutes
- Yield: 8 taquitos
Common Questions You Might Have
Q: Can I use corn tortillas instead of flour? A: Yes. Corn tortillas will give a slightly more authentic texture and a different kind of crisp. Warm them well and handle them gently because they are more delicate than flour tortillas. If they crack, try softening them a little longer in the microwave wrapped in a damp paper towel.
Q: How can I make these ahead for a party? A: Roll them all, place seam-side down on a baking sheet, and freeze until firm. Transfer to a bag. When guests arrive, bake from frozen adding about 5–7 minutes to the baking time. Keep toppings in separate bowls. You can also assemble them and refrigerate for a few hours before baking.
Q: What if my filling seems dry or too wet? A: If filling is dry, add a tablespoon or two of salsa or a splash of chicken broth and mix until creamy. If it is too wet, fold in more shredded cheese or a small amount of breadcrumbs to help absorb moisture. Balance is key so they roll snugly without leaking.
Conclusion
These Crispy Chicken Taquitos are the kind of simple recipe that becomes part of the family lexicon. They make weeknight dinners feel festive and lazy weekend lunches feel intentional. The contrast of the warm, melting interior and the crisp, golden shell is a small edible comfort that can lift a day. I love how flexible they are too. You can tame or spike the heat, keep them light or indulgent, and feed a crowd without spending all evening in the kitchen. I hope you make them on a night when the house needs a little cozy, crunchy joy. Keep a bowl of guacamole nearby, keep the kids talking at the counter, and enjoy the small, delicious rituals of home cooking with Crispy Chicken Taquitos in your rotation.
Print
Crispy Chicken Taquitos
- Total Time: 35 minutes
- Yield: 8 taquitos 1x
- Diet: Gluten-Free (if using corn tortillas)
Description
Crispy Chicken Taquitos that are comforting and quick to assemble, perfect for busy weeknights and family gatherings.
Ingredients
- 2 cups cooked shredded chicken (rotisserie chicken recommended)
- 4 oz cream cheese, softened
- ½ cup shredded cheddar or Mexican blend cheese
- ¼ cup salsa (mild or spicy)
- ½ tsp garlic powder
- ½ tsp chili powder
- ½ tsp cumin
- Salt and black pepper to taste
- 8 small flour or corn tortillas
- Cooking spray or oil (for brushing)
- Chopped cilantro (for garnish)
- Sour cream (for serving)
- Guacamole (for serving)
- Extra shredded cheese (for serving)
Instructions
- Preheat your oven to 425°F (220°C). Line a baking sheet with parchment paper or lightly grease it for easy removal later.
- In a large bowl, combine the shredded chicken, cream cheese, shredded cheese, salsa, garlic powder, chili powder, cumin, salt, and pepper. Mix well until evenly coated.
- Warm the tortillas in the microwave for about 20 seconds to soften them.
- Spoon 2–3 tablespoons of the filling onto one side of each tortilla and roll tightly.
- Place the taquitos seam-side down on the prepared baking sheet. Lightly brush the tops with oil or cooking spray.
- Bake in the preheated oven for 15–20 minutes or until golden brown and crispy. Optionally, broil for 1–2 minutes for extra crunch.
- Serve warm with sour cream, guacamole, cilantro, and extra shredded cheese on top.
Notes
For a spicier version, add chipotle or use pepper jack cheese. Use corn tortillas for a more authentic texture. These are freezer-friendly and can be baked straight from frozen.
- Prep Time: 15 minutes
- Cook Time: 20 minutes
- Category: Appetizer
- Method: Baking
- Cuisine: Mexican
Nutrition
- Serving Size: 1 taquito
- Calories: 250
- Sugar: 2g
- Sodium: 500mg
- Fat: 14g
- Saturated Fat: 7g
- Unsaturated Fat: 5g
- Trans Fat: 0g
- Carbohydrates: 22g
- Fiber: 1g
- Protein: 14g
- Cholesterol: 40mg
Keywords: taquitos, chicken, appetizer, crispy, easy recipe, family-friendly